


Ever had that moment where you step into the shower and—bam—ice-cold water hits you? It’s usually the exact moment we realize we haven’t thought about the water heater in a while. Flushing your mobile home’s water heater is one of those simple maintenance tasks that tends to fall to the bottom of the list… until something goes wrong.
The thing is, it doesn’t take much to stay ahead of those issues. With just a bit of time and a few basics, you can keep things running smoothly, extend the life of your heater, and enjoy more consistent hot water. It’s all about making a small investment in upkeep now to avoid bigger hassles (and bills) later. Sound like a win? Let’s walk through it together.
Why Flushing Matters More Than You Might Think
Over time, tiny mineral particles—mostly calcium and magnesium—build up inside your water heater. This is called sediment. It settles at the bottom of the tank and slowly causes trouble. Think of it like lint in a dryer or sludge in a car’s engine: easy to ignore, until it starts making things worse.
Here’s what sediment buildup can do:
- It lowers efficiency, making your heater work harder and burn more energy.
- It reduces how much hot water your tank can hold.
- It can cause weird knocking or rumbling sounds.
- And over time, it can damage heating elements or even corrode the tank.
In short, flushing your mobile home’s water heater is a simple form of preventive care that protects your comfort—and your wallet.
How Often Should You Flush Your Mobile Home’s Water Heater?
As a rule of thumb, once a year is usually enough. But if your area has hard water, doing it every six months can be even better.
Is yours overdue? Here are a few signs:
- Your hot water doesn’t last as long as it used to.
- The water heater makes gurgling or popping noises.
- You see rust or cloudy particles in the drained water.
- Or the hot water has a faint metallic smell.
If any of these sound familiar, your mobile home’s water heater could use a good flush.
What You’ll Need Before You Start
No need to overthink it—chances are, you already have most of these on hand:
- A standard garden hose
- Flathead screwdriver
- A towel or rag
- A bucket (helpful for checking sediment)
- Optional: work gloves (if you’re dealing with warm water)
That’s it. Let’s get started.
Prepping the Tank: Safety First
Before you do anything, turn off the power to the water heater.
- Electric heaters: flip the breaker in your panel box.
- Gas heaters: set the thermostat to “Pilot,” “Vacation,” or turn it off completely.
This keeps heating elements from turning on while there’s no water inside—something that can cause serious damage.
Next, shut off the cold water supply to the tank. If your heater doesn’t have its own shutoff valve, you might need to turn off the home’s main water line.
Lastly, go to a sink or tub and turn on the hot water. This relieves pressure in the system and makes draining the tank a whole lot smoother.
Step-by-Step: How to Flush Your Mobile Home’s Water Heater
1. Connect the hose
Screw one end of the hose to the drain valve at the bottom of the tank. Run the other end to a floor drain, driveway, or somewhere it can safely empty.
2. Open the drain valve
Use a screwdriver (or just your hand, depending on the type) to open the valve. Water will start to flow—remember, it could be hot, so take care.
3. Drain the tank
Let the tank drain completely. Depending on size and sediment, this can take 20 to 45 minutes. You can collect some water in a bucket to check for rust, sand, or other debris.
4. Flush with fresh water
Keep the hose connected and open the cold water supply briefly to flush out leftover sediment. Run it until the water from the hose is clear—just a few minutes is usually enough.
5. Close the valve
Turn off the water again, remove the hose, and securely close the drain valve.
6. Refill the tank
Turn the cold water back on. Leave the hot water faucet open until a steady stream flows—this lets trapped air escape.
7. Aftercare: Getting Things Running Again
If your heater runs on electricity, go ahead and flip the breaker back on. If it’s gas, relight the pilot or turn the thermostat back to your normal setting.
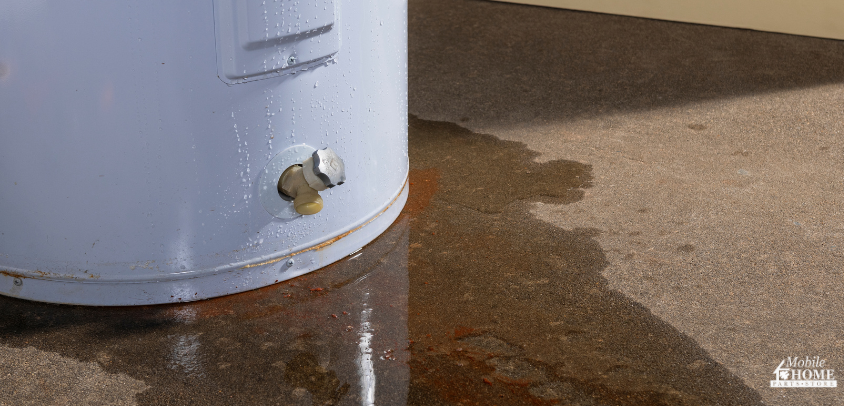
Take a moment to check for leaks around the base or from the drain valve. This is also a great time to inspect your pressure relief valve and overflow pipe—quick checks now can prevent bigger problems later.
What Happens If You Skip This?
We all forget sometimes. But skipping this task year after year can cost you more than just hot water.
- Your heater may take longer to warm up—and use more energy doing it.
- Sediment can lead to wear and tear that shortens the unit’s life.
- You could end up needing expensive repairs or even a replacement.
Flushing your mobile home’s water heater isn’t just a chore—it’s a smart way to stretch your dollars and keep your showers consistently warm.
When It’s Time to Call a Pro
While this job is DIY-friendly, it’s totally okay to call in help if:
- The tank won’t drain (a clog may be blocking the valve).
- Your unit is older or showing signs of serious rust or damage.
- You’re not comfortable relighting a pilot or adjusting gas controls.
Better safe than sorry—especially when working with heat and water.
Water You Waiting For?
It doesn’t take much, but flushing your mobile home’s water heater every now and then makes a difference. A little time, a few tools, and you’re helping your system run better for longer. Nothing fancy—just solid upkeep that keeps the hot water coming.
And if you ever need water heater parts or a replacement down the line, Mobile Home Parts Store is a good place to start. They’ve been around the block and carry what you’ll actually use.
Tags: how to, mobile home water heater, water heater, Water Heater Repair

