


There’s something exciting about picturing a new bathtub in your bathroom—the kind of change that makes the whole space feel brighter, cleaner, and more like you. But if you’ve ever stood in the aisle staring at all the parts and pieces wondering where to even begin, you’re not alone.
The truth is, installing a tub isn’t as overwhelming as it seems. The hardest part isn’t the work itself—it’s just making sure you’ve got the right supplies lined up before you start. Once everything’s on hand, the project shifts from intimidating to totally doable.
So, let’s walk through what you’ll want to have ready before the first drop of caulk or twist of a wrench. Think of it as building your own starter kit for success.
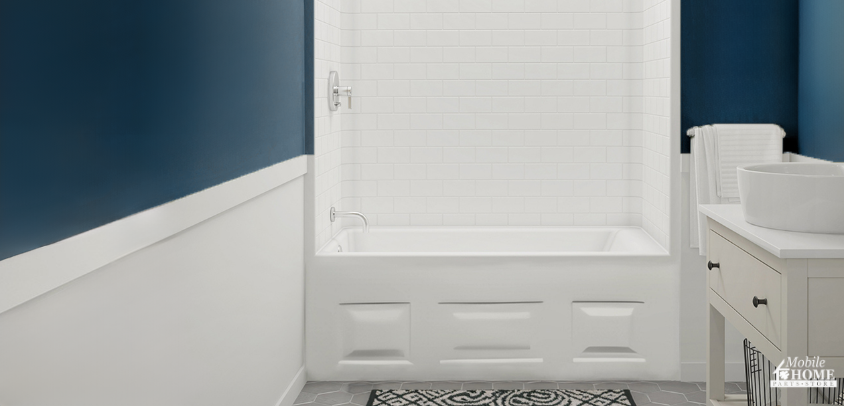
Choose a New Bathtub That Fits Your Space
Start with the centerpiece—the new bathtub itself. Picking the right one sets the tone for the entire project.
Measure your space carefully, not just the width and length but the height and how much clearance you have to get it through the doorway. Bathtubs come in a few common materials, and each has its perks: acrylic tubs are lightweight and easy to maneuver, and fiberglass ones are budget-friendly and simple to install.
Before you slide it into place, give it a good once-over. Check for any chips, cracks, or dents that could turn into leaks later. And when you do set it, use a level to make sure it’s perfectly even. A slight tilt might seem harmless, but it can cause slow draining and standing water over time—and it’s much easier to fix now than later.
Add a Protective Bathtub/Shower Surround
Once the tub is chosen, think about what’s going on the walls around it. A new bathtub won’t last long without protection from water damage, and that’s where a bathtub/shower surround comes in.
Surrounds come in smooth panels or tile-look designs, and many are made to fit snugly over the edge of the tub. Accurate measuring is key here. A surround that’s even slightly off can let water sneak behind it, and that’s how mold and wall damage start.
When it’s installed, run a bead of silicone sealant along every seam. It’s not the most thrilling step, but it’s one of the most important. This is what keeps water where it belongs and gives the whole space that crisp, finished look.
Finish the Look with Bath/Shower Doors
If you’re ready to retire the old shower curtain, adding bath/shower doors is a simple upgrade that makes a big impact. They keep water in the new bathtub where it belongs, and they give the whole bathroom a clean, polished feel.
Sliding or hinged doors both work well, and you can choose between clear glass for an open look or frosted for extra privacy. Coastal-brand doors are a dependable pick here—sturdy, stylish, and built to last.
Whichever style you go with, you’ll immediately notice the difference: no puddles on the floor, less daily cleanup, and a bathing space that feels pulled together and intentional.
Seal Everything with Caulking or Sealant
Now comes one of the quiet heroes of the whole project—caulking. It might not be glamorous, but it’s what keeps your bathroom from turning into a slow-motion disaster later.
Use a high-quality silicone sealant along every edge and joint where water might try to sneak through—where the new bathtub meets the wall, around the surround, and anywhere pipes pass through. Silicone stays flexible, resists mold, and holds up to daily use.
This is the moment to slow down. A clean, even line of caulk not only looks better, but it also lasts longer. It’s the kind of careful detail that gives your bathroom that “professional finish” feeling every time you walk into the room.
Get a Reliable Drain Kit and Plumbing Fixtures
Of course, a tub can’t do its job without the plumbing to back it up. That starts with a drain kit. These kits typically include the drain assembly, the overflow pipe, and all the fittings you’ll need to hook it together. Make sure the one you choose matches your new bathtub’s design and fits your existing plumbing setup.
Then, round out the project with your fixtures—faucets, handles, and a showerhead. Think about how they’ll look with the rest of the space, and choose finishes that stand up well to daily steam and splashes. Chrome and brushed nickel are always safe bets.
Before you call it done, test everything. Run the water, check for leaks, and tighten any connections that need it. Catching small drips now can save you from major headaches later.
Don’t Overlook Bathroom Ventilation
In the excitement of planning, it’s easy to forget about ventilation—but it’s just as important as the visible parts. Moisture builds up quickly in a bathroom, and without good airflow, it can lead to mildew not just on the ceiling, but around your new bathtub too.
A properly sized exhaust fan keeps the air moving and clears out steam fast after a bath or shower. It protects your walls, your ceiling, and even your fixtures from the wear and tear of constant humidity.
It’s a quiet part of the project, but a powerful one. Proper ventilation helps your hard work stay beautiful and functional for years to come.
You’ve Got This
Take a breath and trust your plan. Lay out your parts, double-check the fit, and move at a steady pace—no rushing the sealant, no skipping the little checks. Most of this project is about prep and patience, not perfection, and every small step you take adds up to something you can be proud of. It might feel like a lot at first, but once you see everything coming together, the hard part fades and the excitement takes over.
Remember, you don’t have to know everything on day one—just be willing to learn as you go. And if you want trusted, quality parts or a bit of friendly advice along the way, Mobile Home Parts Store is a great place to begin.
Tags: bathroom, bathtub, bathtub faucet, bathtub surround, caulking, exhaust fans, shower door

