


Vinyl siding damage has a sneaky way of appearing out of nowhere. One day, everything looks fine; the next, you notice a small crack, a hole, or a panel bowing just enough to catch your eye. Maybe it’s from last week’s storm, a baseball that strayed too far, or years of sun and weather slowly wearing the material down.
It’s tempting to shrug it off—after all, it doesn’t look urgent. But even a small flaw can lead to bigger headaches. A hairline crack can let water seep behind the panel, causing rot or mold. Gaps can give pests an easy way in. Once moisture or insects find their way inside, the damage spreads faster than you’d expect.
Most siding repairs, though, are easier than they seem. With the right approach, you can catch problems early, make quick fixes, and keep your siding looking—and performing—its best. Let’s go over what causes the damage, how to tackle minor repairs yourself, and when it might be time to replace a panel or two.
Before You Start: Match Before You Patch
Before you grab a ladder and start pulling panels, it’s worth taking a moment to set yourself up for success. A little planning now will save you frustration—and help make sure the repair lasts.
1. Plan for a Helper
Vinyl siding panels can be long and floppy. Even though they’re light, handling them alone can be awkward—especially on a ladder. A helper can hold panels steady, operate the siding removal tool, and keep an extra eye on safety while you work.
2. Safe Working Setup
If your repair is high above ground level, you’ll need a good ladder—possibly two if your helper is working beside you. For bigger repairs, scaffolding is even better, giving you a wide, stable platform instead of balancing on ladder rungs.
3. Matching Your Vinyl Siding
Getting a perfect match isn’t just about color—it’s about size, style, and texture. Check your panel’s thickness, width, and profile. Even small differences can make the repair stand out. If your vinyl siding is older and faded, a perfect color match may not be possible, but you can still choose something close that will blend better over time.
4. Safety Gear Essentials
- Safety glasses to protect your eyes from flying debris or dust.
- Work gloves for grip and to prevent cuts from sharp panel edges.
- Respirator or dust mask if cutting panels with power tools.
- Following the manufacturer’s safety instructions for all tools and materials is just as important as the repair itself.
5. Timing and Weather
Vinyl siding reacts to temperature—becoming brittle in cold weather and expanding in high heat. Try to work on a mild, dry day so your panels are easier to handle and install. Damp weather can also affect how adhesives and caulks cure, so aim for a stretch of dry conditions.
Common Mobile Home Siding Problems You Might See
Once you’ve prepped, the next step is figuring out exactly what you’re dealing with.
- Small Holes: Usually from rocks kicked up by the lawnmower or accidental bumps from tools or sports equipment.
- Cracks: Often caused by impacts, but sometimes by extreme temperature swings.
- Warping or Melting: Can happen from direct sun exposure or reflected heat from windows.
- Loose Panels: High winds or nails pulling loose over time can cause panels to shift.
- Damaged Corner Trim: Corners take more hits than you’d expect—from ladders, trimming equipment, or even heavy rainstorms.
How to Fix a Small Hole in Vinyl Siding (1 Inch or Smaller)
Small holes are quick to fix but easy to ignore—which makes them risky. Sealing them right away keeps your siding looking good and prevents bigger problems later.
Prep the Area
- Press down any raised edges with a paint scraper so the surface is smooth.
- Lightly sand with 220-grit sandpaper to remove the glossy finish, helping the patch material stick.
- Clean with soapy water or siding cleaner and let it dry completely.
Apply the Patch
- Use a vinyl-safe patching compound or exterior-grade spackling.
- Overfill the hole slightly so you can sand it flush later.
- Feather the edges so it blends into the surrounding siding.
Finish the Repair
- Once dry, sand until smooth.
- Wipe away dust and paint with vinyl-safe exterior paint matched as closely as possible to your siding.
Tip: For holes larger than one inch, replace the panel instead. It’s sturdier and will last longer than a patch.
How to Replace a Damaged Vinyl Siding Panel
When damage is too big to patch, replacing a panel is the way to go. It sounds tricky, but with a siding removal tool and a steady approach, it’s manageable.
Unhook the Damaged Panel
- Slide the siding removal tool under the panel lip until it catches.
- Pull down gently while running the tool along the seam to release it from the panel below.
- Repeat the process with the panel above until the damaged section is loose.
Inspect Underneath
Check the house wrap for rips or holes and patch them with house wrap tape to keep out moisture.
Remove the Nails
Use a pry bar to take out the nails holding the damaged panel. Have your helper steady the panel above so it doesn’t slip.
Cut the Replacement Panel
If you’re not replacing a full-length panel, use the old one as a guide to measure and cut the new piece. Remove sections of nailing fins or bottom edges if needed to allow for proper expansion.
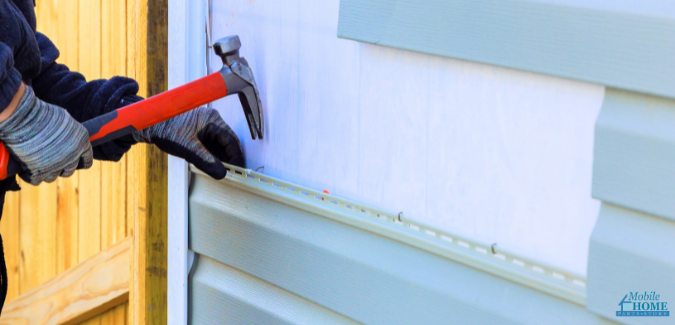
Install the New Panel
- Hook the bottom lip into the panel below.
- Nail every 12–16 inches, centering nails in the slots with a small gap under the head for movement.
- Overlap panels by 1–1¼ inches to match the rest of your vinyl siding.
Lock the Top Seam
Use the siding tool to snap the upper seam into the panel above, working along the length until it’s fully secured.
Repairing Corner Post Trim Damage
Corner posts not only frame your siding—they protect it. Damage here needs attention fast.
- Small cracks can be patched just like siding panels.
- Large sections may need to be replaced.
Replacing a Section of Trim
- Remove any downspouts in the way.
- Cut away the face of the damaged trim at the bend in the J-channel.
- Measure and cut your replacement piece to size, removing the nailing fin if installing over existing trim.
- Apply caulk to the exposed J-channels.
- Press the new piece in place and seal seams with exterior caulk.
- Reattach any removed downspouts.
When It’s Better to Call a Pro
Some siding repairs are perfect for a confident DIYer—but others are better left to someone with the right equipment, training, and experience. Before you decide, take an honest look at your comfort level. If you’ve never worked with hand tools or are uneasy on a ladder, you may be better off hiring a professional from the start. Siding repairs often require balancing on ladders, handling long panels in the wind, and making precision cuts—tasks that are far easier and safer for someone with experience.
Hiring a pro isn’t admitting defeat—it’s choosing the safest, most efficient way to protect your home and investment.
Closing the Gaps
Spotting siding damage can be a little nerve-wracking, but it doesn’t have to turn into a major project nightmare. With the right tools and know-how, small fixes are absolutely doable, and even if you end up calling in a pro, you’ll know exactly what’s needed to get the job done right.
When you’re ready to repair or upgrade, go with materials that work as hard as you do. Harbour Crest™ vinyl siding is built to handle the weather, easy to keep clean, and gives your home a fresh, polished look without the constant upkeep. You’ll find it—along with matching trim, the right tools, and friendly advice—at Mobile Home Parts Store, so you can get the job done and enjoy the results every time you step outside.
Tags: Harbour Crest™ Vinyl Siding, how to, mobile home siding, siding, vinyl siding

