


Is your RV Air conditioner slow to start?
Is it just not working as well as it used to?
Or is living in a sauna on wheels just not as fun as it used to be?
Whatever the case, if you’re considering buying an air-conditioner for your RV then you’re in the right place.
Today you’ll learn everything you need to choose the right AC unit for your RV and keep it working wherever you meet warmer weather.
- How to Buy an RV Air Conditioner
- The Different Types of RV Air Conditioners
- How to Install an RV Air Conditioner
- How to Maintain an RV Air Conditioner
How to Buy an RV Air Conditioner
You wouldn’t make a financial investment, blindly would you? I assume not, but we all know what happens when we do that.
If you want to be smart about buying an RV air conditioner, you need to understand what factors to base your decision on.
After all, you aren’t just trying to cool a single, well-circulated room, you’re trying to lower the temperature of a large metal vehicle.
What did I tell you? I just assumed you have a large RV, and you could have a small camper.
The point is, depending on the size of your vehicle, your AC needs will be drastically different.
So, figure out which of the factors in this guide are most important to you, and invest in those.
Cooling Capacity & British Thermal Units (BTUs):
When purchasing an air conditioner for your RV, one of the biggest things to consider is the unit’s BTUs, as they determine how well an ac unit can cool your RV, in addition to much of the cost.
RV air conditioners usually have technical specs that cover BTUs concerning different vehicles.
The standard is 13,500 BTU, but a large RV can require at least 18,000 BTUs if you want consistent climate control throughout the vehicle.
Remember, the larger your AC unit the more power it needs to run.
So, make sure you understand just how much juice your unit will need, and if you have the energy to run it before you spend any money.
Size:
The size of your air conditioner directly determines the amount of fuel and energy it uses to cool your vehicle and how much space it will take up.
While small units don’t have the power of large ones, you can still expect them to compensate by providing a lower price and taking up less space, without skimping on the quality.
However, a large air conditioner offers more reliable cooling throughout your vehicle but takes up more space and comes at higher costs.

Vehicle Size:
If you haven’t picked up on it already, the size of the unit isn’t the only dimension that matters.
The size of your vehicle impacts more than the remaining space after you install your air conditioner.
For a small or medium vehicle, one air conditioner is at least enough to regulate the temperature in the cabin and the sleeping area.
However, for longer vehicles, it’s not uncommon to install an additional unit.
If it doesn’t exceed the weight limit of your RV’s roof, a roof-mounted AC unit will save you interior space, but increase your wind resistance and clearance height.
BONUS TIP – Insulation: The insulation of air conditioning units varies greatly, depending on the needs and size of your vehicle. Refer to either your dealer or service center for info on how the unit fits with your specific vehicle.

Frequency of Use:
How often you’re going to use your AC is another important buying factor.
If you RV full-time and will be running the AC often, then it makes sense to spend a little more upfront to get a more powerful unit that will last you a long time.
But if you’re only a weekend RVer or boondocking is only a hobby you won’t be putting the same wear on the unit that a full-timer would.
Power Consumption:

As one of the most energy-taxing appliances, you’ll have in your RV, an air conditioning unit needs to connect to a portable generator to run.
Don’t have a generator yet? No Problem.
A model between 3,500 W and 5,000 W will allow you to power all the electronic appliances and devices that you want to use at the same time.
No need to choose between your comfort or keeping your leftovers cool.
However, keep in mind that more energy-efficient units are more financially savvy, and are eco-friendlier.
BONUS TIP – Battery Power: While it requires stringing together solar panels, generators, or extra batteries, it is possible to run your RV air conditioner on battery power.
Power Compatibility:
If you travel internationally, then you need to ensure that your RV electrical hook-ups are compatible with the local electricity source. Power sources vary between countries and may require different sized fuses.
So, make sure your air conditioner is compatible with the electricity in your area or ensure that you have a suitable generator as an alternative.
This is also great if you tend to travel “off-grid” or go boondocking in more isolated areas.
Where You’ll be Wandering:
Where you take your RV will largely determine your ability to cool
your vehicle.
If you’re passing through a desert or other hot and dry climate, most RV Airconditioning units can handle this just fine.
However, if you plan on staying in areas with high humidity and extreme heat, spending much time over hot asphalt, and avoiding shade at all costs, then you’re going to need a powerful unit if you want to even think about being cool.
A BTU power of more than 13,500 is ideal if you have a large RV, but you’ll want more if you frequent hot destinations.
Whatever AC unit you choose, make sure it can start well and be reliable in humid conditions. You don’t want to find yourself stranded in the heat, waiting for help to arrive.
BONUS TIP – AIR PURIFIER: If you find yourself traveling to areas with low-quality air quality or pollution, you can get an ac unit with an air purifier function! Not only will it improve your air quality, but it will also help eliminate many of the strange smells that make into your RV. (Don’t lie, it happens to all of us.)
Price:
Like the rest of your road trip, budget is a major determining factor here.
Consider the size of your RV, the kind of convenience you want in terms of climate control, and the conditions you’ll be using it in.
If you’re using the AC in moderate temperatures instead of extreme heat, then you won’t need to spend as much – especially if you only have space for a small unit.
Most importantly, remember that a higher price doesn’t always mean higher quality.
Like I said earlier, decide which factors are most important to you, and invest in those.
Installation:
Picking out an air conditioner for your RV is one thing, but actually getting it into your vehicle is another.
Ideally, it should be easy to install your RV air conditioner right after you but it.
That way, you won’t have to pay for a professional to set it up successfully.
However, if that’s not an option, hire the professional.
Hurting yourself trying to install the unit will be more costly than the price of the service.
Fortunately, you can work off the provided instructions to easily install an RV air conditioner in most cases.
Although things become more complicated when combining parts from different manufacturers or customizing an existing system.
We’ll go over how to install your RV air conditioner later in this guide.
Maintenance:
Regularly cleaning your RV air conditioner isn’t just crucial for the unit to keep working efficiently. It’s an important part of general RV maintenance.
You’ll be doing your future self a huge favor if you buy a unit that’s easy to maintain, make minor repairs for on the road, and comes with spare parts and warranty.
If you take care of your unit, then your air conditioner will take care of you, and keep you from needing repairs in the middle of your trip.
We’ll go over more on maintenance a little further in this guide.
The Different Types of RV Air Conditioners
While there are several different types of RV air conditioners, you may find that your vehicle is not compatible with all of them.
Here you can find all of your options and figure out which unit best fits your needs, and the capabilities of your camper.
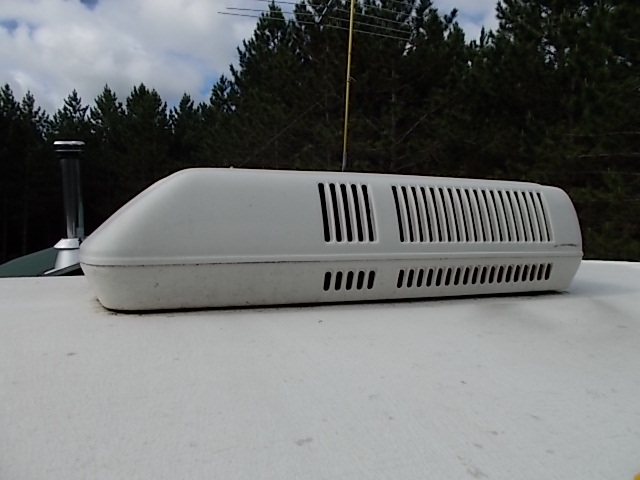
Rooftop AC Unit:
doityourselfrv.com
Rooftop air conditioners are positioned over the window in your vehicle’s roof, with an average BTU of around 15000 bytes.
From this spot, you can conserve valuable storage space, which is ideal for people with smaller vehicles and if you can purchase a unit with an integrated window you won’t have to sacrifice the natural lighting.
But the roof must be flat and have enough space to fit among your other devices.
A rooftop AC unit usually weighs around 100 lbs, so you’ll need at least one other person for lifting and installation.
Don’t forget that it will add to your vehicle’s height.
Buying a sleek, low-profile rooftop model will minimize this greatly, and keep you from hitting any low overhangs.
BONUS TIP – Ducted AC: When combined with a duct system, a rooftop AC Unit can easily distribute air throughout your entire RV.
Vent-Free Portable Air Conditioner:
Most vent-free portable air conditioners evaporate water to rapidly cool down an area.
With only one vent, it doesn’t consume much energy, and its small size takes up little space.
However, you may need to improvise as unevaporated water can leak through the device.
This type of unit is best used in climates with relatively dry heat, as humid weather will counter the cooling effect and nullify it.
Stick to dry atmospheres to get the most out of this unit.
BONUS TIP – Vent Position: The position and number of vents that are present within the air conditioner unit affect the airflow. Units with vents situated on different sides of the unit, create more airflow and will cool down an area faster.
Portable Air Conditioner:

overstock.com
Portable RV air conditioners use one or two holes to ventilate the hot air between the device and outside, with little to no installation required.
These devices come with adjustable frames that are placed under the window to keep the hoses in place.
While they are easily accessible to anyone who needs an AC unit, make sure you read some reviews as they vary greatly in price, quality, amount of noise created, and amount of space they take up.
Window AC Unit:
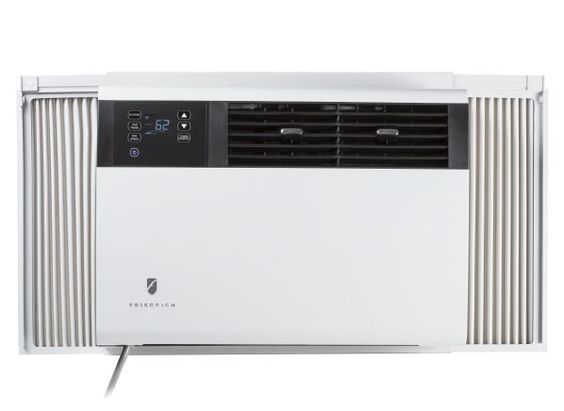
consumerreports.org
There are several advantages to opting for a window AC unit.
Their small size makes installation easy, they take up little space, make little noise, have high energy efficiency, and are usually more affordable than a rooftop unit.
However, they are un-ducted, and combined with their small size means they’re best suited to cooling off smaller spaces.
Window units also restricted to your vehicle’s existing openings, (vents and windows) unless you want to cut open a new one to avoid losing a natural light source.
Non-ducted/ Ducted
A ducted air conditioner uses the ducts inside your RV or trailer to distribute the cool air throughout your RV, allowing you to cool multiple rooms through just one unit.
Instead of a low hanging ceiling console, you can use a thermostat or remote to adjust the temperature.
These types of units are ideal for improving airflow throughout your vehicle, controlling humidity, and maintaining a clean aesthetic (who said visuals weren’t an important factor?)
Non-ducted units are extremely versatile, usually placed in an opening of a roof or a window with a control console on the physical unit.
These air conditioners cool off an area by pushing out cold air directly into the surrounding area.
Usually easier to install since they are lighter, non-duct units are great for controlling the temperature of a specific area and are best used in small rooms.
Under Bench Air Conditioner:
You can expect this type of RV air conditioner to fit neatly beneath a bench or inside a compartment. It’s an ideal choice if you’re looking to conserve space on the outside of your vehicle.
Since these units are located in the base of your vehicle, they are almost always ducted, helping them cool multiple rooms.
Unfortunately, it’s location also comes at a cost.
Cool air doesn’t rise, so pushing air up through your vehicle from the bottom is less efficient than if the unit was placed higher up and its location sacrifices some internal storage space.
Fortunately, this is a great place for an RV heater, and getting a unit that can do both is a cost-effective option.
BONUS TIP – Heater: Air conditioners can do more than just cool air. Many units function as heaters as well, (no, not because they don’t work) and if you plan on traveling from extreme heat to extreme cold, having a single unit that can handle both environments is extremely useful.
How to Install an RV Air Conditioner
When installing your RV air conditioner always refer to the manufacturer’s guide or manual.
The installation process will vary depending on the type of unit you’re installing.
Whether you’re replacing an existing unit or installing a brand new one, the basic principles listed below remain largely the same.
If you’re not confident you can lift 100 lbs onto your roof alone, grab a friend, or hire a professional.
It’s more affordable to hire an electrician or RV repair expert than it is to damage your unit or vehicle or accidentally hurt yourself.
How to Replace a Rooftop RV Air Conditioner
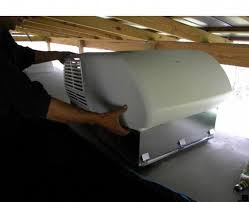
axeladdict.com
Prepare Site for New RV Air Conditioner:
1.) The first thing you need to do before you get started is to turn off the power in your RV. You don’t want to accidentally get a nasty shock.
2.) Next, remove Shroud and interior console. From inside your vehicle, you can disconnect the wiring of the old unit and unbolt it from the ceiling.
3.) To separate the old unit from the roof of your vehicle, use a wedge tool such as a putty knife or screwdriver, and unbolt the old unit. Then carefully remove it from the roof (this is where having an extra set of hand is helpful).
4.) Use the wedge to remove any remaining sealants and dirt, ensuring a watertight seal for the new unit.
Installing the New Unit:
5.) With the gasket properly aligned and the unit’s lower end facing the front of your vehicle, carefully lower it into the opening.
6.) Attach the new ceiling flange from the inside and wire the new unit to your electrical system. Most rooftop air conditioners come with prepared wiring which you can simply plug into the connection that hooked up to the old ac unit. If your vehicle is not specifically wired for the air conditioning then-new wiring must be installed. This is best handled by a professional electrician or RV repair expert.
7.) Once your unit is in place, apply new sealant around the edges. This will keep water from leaking in through your roof.
8.) Remove any additional adhesive and trim the duct, attach the ceiling assembly, and attach the shroud over the unit.
Installing a Rooftop AC Unit in a Vehicle That Has Never Had One:
Installing a rooftop ac unit in an RV or camper that has never had one before is still possible, just a little more involved.
1.) Pick out an existing skylight or roof vent that can accommodate an ac unit. Otherwise, you will need to create your own hole, but cutting a new hole is best left to the professionals.
2.) Remove the window hardware, window shades, and covers, and set them aside. Preferably on a blanket, so you don’t scratch anything or lose any pieces.
3.) After clearing out space, make sure the shorter end of the unit is facing the front of your vehicle to reduce wind resistance and lower it gasket first into your opening.
4.) Bolt the unit to the top, and go inside to install the fan and interior assembly, which should be secured with nuts to the ceiling.
5.) Likely, you won’t have any new wiring, and this will require a professional electrician or RV repair expert for this part of the installation.
6.) After getting hooked up, it’s just a matter of attaching the console.
Installing A Window AC Unit

wanderthewest.com
Installing a window AC unit is a great option for smaller RV’s and campers.
However, these units are usually designed for a traditional window. So, you may have to break out the tools and build a frame of your own.
1. Building a Frame
Most components of a window ac unit don’t fit directly in the windows of an RV, so most RVers piece together a wooden frame to secure the unit.
You can get a little creative here, but as long as you can seal the remaining spaces around the window with some form of insulation, you should be good to go.
Measure the space around your air conditioner and window twice, and you’ll only have to cut once.
2. Remove the Window or Vent
If you’re installing your unit in a sliding window, you probably won’t have to remove every part of the window, but if it’s a regular window or vent, then it’ll have to come out to make room for the air conditioner.
3. Insert the AC Unit and Secure Frame
If your frame doesn’t take up the window space exactly, that’s fine. Ideally, it fits within the window or wraps around the outside, and anchors the air conditioner to the vehicle. Once the air conditioner is safely secured, fill the remaining space with sealant or insulation.
4. Plug Unit Into an Electrical Outlet:
With your wall ac unit attached to your vehicle and properly sealed, you can finally plug it in and enjoy some cooler temperatures.
How to Maintain A Working RV Air Conditioner
Just because you’ve installed your air conditioner doesn’t mean you can forget about it.
If you want to get the most out of your investment and prolong the unit’s life span, proper, consistent maintenance is crucial. A preventative approach to repairs is the best strategy for saving money on your unit long-term.
It is best to follow your unit’s manual as all units are slightly different, but the general maintenance tips outlined below are a good idea regardless.
Remember, turn off all power first!
Exterior RV Air Conditioner Maintenance
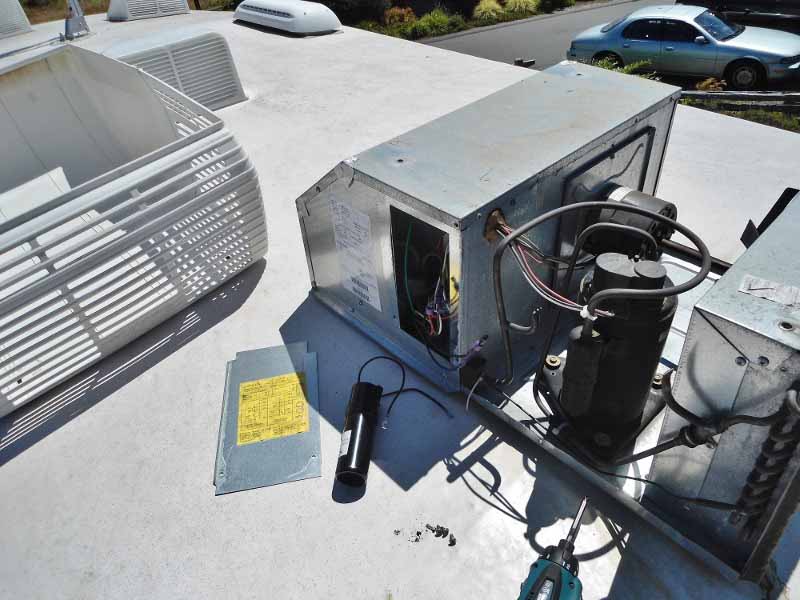
If you’re comfortable clambering up on to the roof of your RV or camper (and it can safely support you) here’s what you can do from the outside.
-
Inspect the Shroud
Take the shroud off your unit and check for wasp nests. They love space between the unit and the shroud.
Check that there are no cracks in the plastic, as years of exposure to the sun will break down a should. If you catch them early, you can seal these cracks and prolong the shroud’s lifespan. Otherwise, it’s time to buy a new one.
If you’re at a stop and won’t be using the ac for a while, open the shroud to let the moisture evaporate.
-
Clean the Fan Blade
Wiping down a dirty fan blade is easy enough, and will keep it from getting stuck, ensuring that it spins smoothly.
-
Clean the Unit’s Filters Once a Month
If your ac filters are dirty, you can wash them in warm water and leave them to air dry before reinstalling. If the filter is torn or won’t come clean, replace the filter.
-
Clean the Evaporator Coils
With the cover off and the filters removed, you have easy access to the evaporator coils. Proper maintenance of these coils ensures good airflow and prevents the unit from overheating.
Uses a soft bristle brush or vacuum to carefully remove any buildup of dirt or debris from the evaporator coils.
-
Clean the Condenser Coils at Least Once a Year
If you were hoping to clean more coils, then I have good news. By using some compressed air, blowing from the inside, out, you can clear any debris that may have gotten trapped in the Condenser Coils.
-
Straighten Cooling Fins
Bent cooling fins will restrict airflow through the unit reducing the air conditioner’s cooling ability.
They make tools specifically for straightening cooling fins, but if you are extra careful not to puncture the condenser tubes, you can get away with the time-consuming tactic of using a comb knife or other small, flat wedge to get the job done.
-
Inspect Motor for Rust and Grime
Not all ac motors need to be oiled to work properly, but they can all benefit from being wiped down every once in a while. For those that do, (they will usually have oil tubes), make sure they are treated consistently to keep them running smoothly.
If the AC fan motor still seems to start slowly or needs a nudge to start working, it is recommended that you replace it with a new one. However, a motor with oil tubes can be rebuilt or replaced for much less than the cost of a new one.
If the fan motor or compressor fails to start completely, you may need a new capacitor. Fortunately, these capacitors may be found at your local AC parts dealer or online for an affordable price.
Just be careful when uninstalling the old ones as they can give you a shock.
-
Inspect Compressor
Unfortunately, these are difficult and expensive to repair to the point where it is often more affordable to get a new compressor or even a new unit entirely.
Internal Air Conditioner Maintenance
Interior maintenance is a little less involved but just as important, don’t neglect to do it.
-
-
Removing Dirt
Use a vacuum or compressed air to clean out any dust and dirt.
-
-
-
Check For Leaks Around the Gasket
Look for leaks, around the opening of your unit, especially around the gasket. A leak that goes unnoticed can lead to expensive repairs in the future.
-
-
-
Tighten the Bolts
Check the tightness of mounting bolts. This will help keep your unit sealed.
-
Wash Your Filters
Just like your exterior filters, your OEM foam filter can benefit from a routine washing. Keep an eye on its condition and clean out any dirt that occurs.
By checking your RV air conditioner consistently and practicing routine maintenance, you can prevent the concerning noise, leaks, and smells that signal bigger and more expensive problems.
Cooled Off Yet?
Did you find an RV air conditioner that best suits your needs?
Are you enjoying it’s refreshing air as we speak?
Then take a second and let us know how things went.
If you think there’s any important information we missed, let us know by leaving a comment right now!
Tags: Air Conditioner, Buyers Guide, installation, maintenance, Repair, RV, rv air conditioner, rv maintenance, rv parts, RV products, RV supplies

