


You know the smell. Dinner’s on the stove, the range hood is running, and you expect the steam and odors to clear out fast. But the air hangs around longer than it should. It’s easy to blame the fan, but the problem often starts outside.
That exterior vent is the final exit for everything your range hood pushes out. If it’s cracked, loose, or poorly sealed, airflow slows down and outdoor air or moisture can work its way back inside.
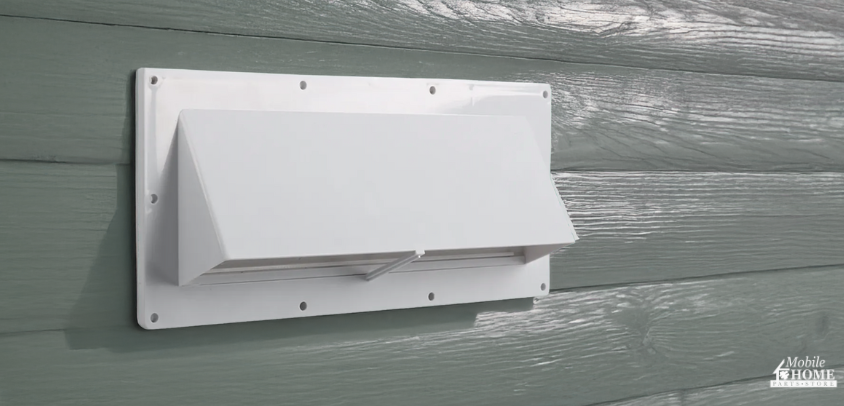
This guide shows you how to install the Ventline range hood vent designed for lap siding. We’ll focus on proper fit, solid sealing, and a finished install that holds up over time.
A Closer Look at the Ventline Range Hood Vent
Designed for lap siding, this Ventline exterior sidewall vent gives kitchen exhaust a clean exit while sealing against the wall. Instead of forcing a flat vent over stepped siding, it uses a two-piece mounting block with a return flange. The back section seats into the siding profile, and the front trim piece finishes the opening so the vent looks clean and intentional once installed.
The body is molded plastic and includes a built-in damper that opens when the fan is running and closes when it’s off. That simple action helps reduce drafts and limits rain and wind from pushing back through the duct.
Before you start, check the following dimensions:
- Mounting block outside dimensions: 7 1/2″ wide x 14 1/4″ long
- Rough opening: 3 1/2″ wide x 10″ long
- Vent face size: 5 1/4″ wide x 11 5/8″ long
If your wall opening and duct line up with these measurements, or can be adjusted to them, this kit is a good fit and ready for installation.
A Quick Fit Check Before Installation
Before you reach for sealant or screws, take a few minutes to confirm everything lines up.
Verify the Opening and Coverage
If you’re replacing an existing vent, measure the actual cutout in the wall, not the old vent cover. You’re looking for an opening close to 3 1/2″ by 10″.
If the opening is slightly oversized, that’s not automatically a problem. What matters is coverage. The vent face and mounting block should fully hide the opening so there are no exposed gaps, old caulk lines, or screw marks once the vent is installed.
The mounting block’s larger footprint helps here. At 7 1/2″ by 14 1/4″, it often covers the outline left behind by the old vent. Hold it up to the wall and check the edges before moving on.
Check Duct Alignment and Siding Fit
Look into the opening and confirm the duct lines up with where the vent collar will land. Even a small misalignment can reduce airflow or cause the damper to rattle when the fan is running.
Because this is lap siding, also check how the return flange will sit. In some cases, the siding course above or below the opening may need to be loosened slightly so the mounting block can tuck in without bowing.
Taking Care of Trouble Spots Early
Before continuing, fix these two problems if you see them:
- Soft or damp material around the opening
- An opening that’s noticeably out of square
Take care of these now. Sealing over trouble spots only creates bigger problems later.
What You’ll Need Before You Start
You don’t need specialty tools for this job, but having the basics on hand keeps the install moving and helps you avoid rushing key steps.
Have the following ready:
- Tape measure and pencil
- Drill/driver and a hand screwdriver
(Hand-tightening helps prevent over-crushing plastic parts.) - Plastic scraper or putty knife
- Utility knife
- Rags
For fasteners, use corrosion-resistant screws long enough to grab solid structure without penetrating too deeply. If the existing screws are rusty, stripped, or mismatched, replace them. Exterior openings aren’t the place to reuse questionable hardware.
For sealing, non-hardening putty or butyl tape is paramount. This acts as the primary gasket behind the vent flange. Exterior-grade silicone caulk is optional and best used sparingly as a finish bead. Installed this way, a Ventline range hood vent seals reliably without relying on heavy caulk to do all the work.
Surface Prep: Where Most Leaks Start (and Where You Stop Them)
If you’re replacing an existing vent, remove the screws and ease it off the wall. Old putty or butyl tape can hold tight, so take your time. Use a plastic scraper to lift the residue without damaging the siding.
Once the vent is off, clean the mounting area. The surface needs to be smooth enough for the mounting block and vent flange to sit flat. Wipe away dust, old sealant, and any loose debris. If there’s a light grease film, clean it off so the tape can bond properly.
Next, inspect the rough opening. Look for discoloration, softness, or moisture. Address any issues now, before the vent goes back on. This opening passes through the wall system, and it needs to be solid before it’s sealed up again.
Before applying any sealant, do a dry fit. Hold the parts in place and check the fit.
- First dry fit: Set the mounting block against the siding and confirm the return flange seats cleanly.
- Second dry fit: Insert the Ventline range hood vent into the opening and confirm it sits square, and the damper has room to move freely.
If anything feels forced, stop and correct it. It’s usually the siding or an opening that’s slightly off. Fixing it now is far easier than trying to pull things into place with screws later.
How to Install the Ventline Range Hood Vent for Lap Siding
Once the surface is clean and the dry fit checks out, you’re ready to install. Working from the wall outward helps keep everything aligned.
1. Separate the Vent and Mounting Block
The vent ships with the mounting block assembled. Remove the two screws that join the vent and front trim to the rear mounting block. Set the vent and trim aside so the rear block can be installed first.
2. Install the Rear Mounting Block
Place the rear mounting block over the rough opening and seat the return flange into the lap siding. If needed, loosen the siding slightly so the block can sit flat without forcing it.
Start all screws before tightening. Once the block is straight and centered, tighten the screws until they’re secure and flush. Do not over-tighten. The block should sit flat without bending.
3. Apply Non-Hardening Sealant Tape
Apply a continuous strip of putty tape or butyl tape to the contact surface where the vent flange will land. Press it firmly into place and overlap the ends. Pay close attention to the top edge. This tape is the primary seal.
4. Install the Vent
Insert the vent collar into the opening and align it with the duct. Press the flange against the sealant tape to begin compressing it.
Fasten the vent using an alternating pattern so it pulls in evenly. Tighten the screws until the flange is flat and seated. Stop once it’s snug. Over-driving screws can distort the plastic and compromise the seal.
5. Install the Front Trim Piece
Position the front trim piece and reinstall the two screws that tie the trim, vent, and rear block together. Confirm the trim sits evenly and nothing is pinched.
6. Apply Perimeter Caulk (Optional)
If desired, apply a thin bead of exterior-grade silicone along the outer edge of the mounting block. Tool it smooth. This bead is for water shedding, not structural sealing.
7. Check Damper Operation
Before finishing up, confirm the damper opens freely and closes on its own. Adjust the damper clips if necessary. The damper should move without sticking or rattling.
A Quick Post-Install Check
Once everything is secured, turn the range hood on at a normal setting and step outside. You should feel warm, moist air exhausting through the vent and see or hear the damper open. Turn the fan off and confirm the damper closes fully.
If airflow feels weak, check the following:
- Vent collar alignment with the duct outlet
- The mounting block is sitting flat without pulling the vent out of square
- Clear duct path with no obstructions
If the damper sticks, chatters, or doesn’t close on its own, loosen the nearby screws slightly. Realign the vent and retighten in small, even steps until the damper moves freely.
Basic Upkeep for Your Exterior Vent
The Ventline range hood vent doesn’t need much attention, but a quick check now and then helps it keep doing its job. Once or twice a year, or after a major storm, take a few minutes to:
- Look for loose fasteners or cracked plastic
- Check that the sealant and tape still look intact
- Clear cobwebs, dust, or debris around the damper
- Run the fan and confirm the damper opens freely and closes fully
These small checks help keep drafts down and moisture moving out of the house instead of back into the wall.
Good Meals In. Bad Air Out.
A clean exterior vent install comes down to fit, sealing, and alignment. When the mounting block sits flat, the sealant tape is continuous, and the damper moves freely, the vent does its job without noise or leaks.
When you’re ready to install or replace your sidewall vent, Mobile Home Parts Store carries the Ventline range hood vent for lap siding, along with putty or butyl tape, fasteners, and other essentials. If you need help matching dimensions or planning your project, our team can help you choose the setup that fits your home and your next DIY job.
Tags: how to, mobile home range hood, mobile home vent, mobile home ventilation, range hood vent, Ventline range hood vent

