$387.99
Contact us for advice or more details. Our mobile home and RV parts specialists are here to help you and answer your questions.

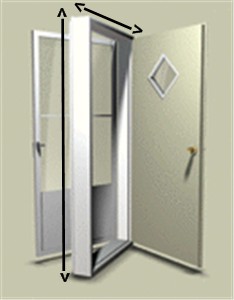
Dimensions: 33 1/2" Width x 76" Length Jamb Mount - Right or Left Hinge Hang
Standard Features
This item ships via:  LTL Freight
Our Goal is to deliver your purchase in the quickest and most economical way possible. Shipping service and costs are determined by product, weight, package size and ship to destination.
To view shipping rates prior to checkout, add the product(s) to the shopping cart. On the My Cart page, click "calculate shipping rates", when the popup appears, enter your state and zip code and click update. The services available for the entire order will appear with the actual cost.
Order Tracking: In most cases you will receive shipment notification via email. You can also track your order online. For assistance contact us.
Materials needed: 3/4" Putty Tape and Screws.
Optional items that may need replacing: Safety Chain and Storm Door Hardware Kit.
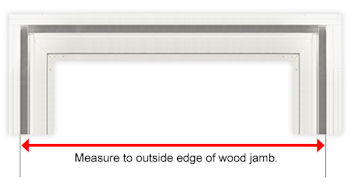
 | Taking Measurements 1. Width: Measure outside to outside of the wood jamb. 2. Length: Measure outside of the wood jamb from the top past the threshold to the floor. Note: The width and length measurements must be exact for the door to properly fit on the jamb. 3. To determine if your door is right or left hinged, simply look at the door from the outside to see which side the hinges are on. Note: Storm doors are sized by the wood frame casing (jamb) which fits into the storm door frame. See Image Below | |||
 | ||||
| Installation Instructions 1. Make certain all mounting surfaces (siding seams included) are securely fastened and flat around perimeter of door opening. | ||||
| 2. Apply a suitable non-hardening sealant tape (Putty Tape or Butyl Tape) to the backside of the door's mounting flange. 3. Do not remove any shipping clips or fasteners and keep the door closed and locked during the installation. Opening the door prior to the installation will destroy the pre-squaring by the manufacturer. 4. Insert the door assembly carefully into the jamb. Make certain the door sill is secure on the floor. Move complete door unit to the hinge side until it is firmly against the stud. 5. Proceed to fasten door with Hex Head Screws. Drive the first 3 screws into the outer pre-punched flange in the middle at the hinge side. Then, drive the next 3 screws in the middle on the lock side. Then, secure the balance of the hinge side, across the sill, up the lock side and the header. 6. Remove the shipping clips and open the door. Install the Storm Door Hardware and Safety Chain. 7. Make sure 2 long screws are installed through the storm door closer bracket fastened to the jamb. This is to anchor the bracket securely to the hinge side stud. 8. If the inner door is secured to the jamb with butt type hinges (some six panel doors), run one long screw through each hinge on the jamb side to penetrate the stud. 9. Some doors will have an adjustable stop. Adjust the stop to the exterior of the inner door to insure a good seal. If these steps are followed, the door will be sealed and operate properly. | ||||
Already purchased this product? Write a review
Dimensions: 33 1/2" Width x 76" Length Jamb Mount - Right or Left Hinge Hang
Standard Features
This item ships via:  LTL Freight
Our Goal is to deliver your purchase in the quickest and most economical way possible. Shipping service and costs are determined by product, weight, package size and ship to destination.
To view shipping rates prior to checkout, add the product(s) to the shopping cart. On the My Cart page, click "calculate shipping rates", when the popup appears, enter your state and zip code and click update. The services available for the entire order will appear with the actual cost.
Order Tracking: In most cases you will receive shipment notification via email. You can also track your order online. For assistance contact us.
Materials needed: 3/4" Putty Tape and Screws.
Optional items that may need replacing: Safety Chain and Storm Door Hardware Kit.
 | Taking Measurements 1. Width: Measure outside to outside of the wood jamb. 2. Length: Measure outside of the wood jamb from the top past the threshold to the floor. Note: The width and length measurements must be exact for the door to properly fit on the jamb. 3. To determine if your door is right or left hinged, simply look at the door from the outside to see which side the hinges are on. Note: Storm doors are sized by the wood frame casing (jamb) which fits into the storm door frame. See Image Below | |||
 | ||||
| Installation Instructions 1. Make certain all mounting surfaces (siding seams included) are securely fastened and flat around perimeter of door opening. | ||||
| 2. Apply a suitable non-hardening sealant tape (Putty Tape or Butyl Tape) to the backside of the door's mounting flange. 3. Do not remove any shipping clips or fasteners and keep the door closed and locked during the installation. Opening the door prior to the installation will destroy the pre-squaring by the manufacturer. 4. Insert the door assembly carefully into the jamb. Make certain the door sill is secure on the floor. Move complete door unit to the hinge side until it is firmly against the stud. 5. Proceed to fasten door with Hex Head Screws. Drive the first 3 screws into the outer pre-punched flange in the middle at the hinge side. Then, drive the next 3 screws in the middle on the lock side. Then, secure the balance of the hinge side, across the sill, up the lock side and the header. 6. Remove the shipping clips and open the door. Install the Storm Door Hardware and Safety Chain. 7. Make sure 2 long screws are installed through the storm door closer bracket fastened to the jamb. This is to anchor the bracket securely to the hinge side stud. 8. If the inner door is secured to the jamb with butt type hinges (some six panel doors), run one long screw through each hinge on the jamb side to penetrate the stud. 9. Some doors will have an adjustable stop. Adjust the stop to the exterior of the inner door to insure a good seal. If these steps are followed, the door will be sealed and operate properly. | ||||
 Show More Accessories


