$172.99
Contact us for advice or more details. Our mobile home and RV parts specialists are here to help you and answer your questions.

Dimensions: 40 1/4" Width x 54 1/8" Length Rough Opening - Interior Vertical Slider
Self-Storing Storm Windows combine durability and efficiency which provide thermal efficiency with easy installation and virtually problem-free operation.
The dual-wall concept combines an aluminum horizontal or vertical window with an aluminum self-storing storm window and installs them on a "weather break" ... consisting of the sidewall studs and outer sheathing. The result ... the most complete structural window combination for guarding against energy-wasting penetration of cold in the winter, heat in the summer ... and reducing window condensation to a minimum - a truly cost effective system.
Features
This item ships via:  LTL Freight
Our Goal is to deliver your purchase in the quickest and most economical way possible. Shipping service and costs are determined by product, weight, package size and ship to destination.
To view shipping rates prior to checkout, add the product(s) to the shopping cart. On the My Cart page, click "calculate shipping rates", when the popup appears, enter your state and zip code and click update. The services available for the entire order will appear with the actual cost.
Order Tracking: In most cases you will receive shipment notification via email. You can also track your order online. For assistance contact us.
Materials needed: Vinyl Foam Weatherseal and Hex Head Screws.
| Taking Measurements Measure the width and length between the rough opening. Note: Measuring the outer frame of an existing storm window or the exterior window will result in incorrect sizing. | |||||
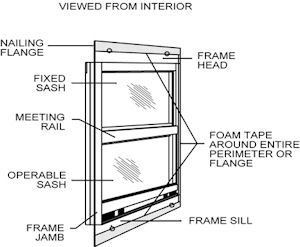
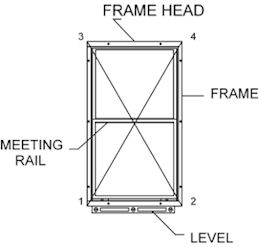
| Installation Instructions 1. Make certain the mounting surface the storm window is to be placed over is correctly sized and constructed. The surface that the storm window is to rest against should be flat, level, and free of any debris. Cover/seal any cracks or holes that may allow for air leakage. 2. Apply a suitable low density foam tape (Vinyl Foam Weatherseal) to the back side of the storm window mounting flange. Failure to seal between the mounting surface and the storm window may cause condensation problems. 3. Place the storm window in the opening. Center the window and install one Hex Head Screw in the frame sill. Level (horizontal) the frame sill and place one screw in the frame head (See Figure 1). Check plumb (vertical) and square (90° corners). The sill of the window should be level within 1/8" across its width. The squareness of the window should be checked with diagonal measurements (See Figure 2). The difference between 1 to 4 and 2 to 3 should not exceed 3/8". Install the remaining screws starting with the sill, then the head and the sides last. Note: Do not over drive the screws; to do so will unduly deform the window frame and compromise the seal. 4. Once the storm window is installed, operate the sash by pushing the (2) spring-loaded slide bolts located on the operable sash towards each other and sliding the sash open. If the sash does not slide smoothly within its window track, check frame to insure it is square and remove screws and re-align window frame if applicable. This should correct the problem. Note: It is possible to install the storm window "upside down" and or "inside out" which will cause the window to operate incorrectly. | |||||
 |  | ||||
Dimensions: 40 1/4" Width x 54 1/8" Length Rough Opening - Interior Vertical Slider
Self-Storing Storm Windows combine durability and efficiency which provide thermal efficiency with easy installation and virtually problem-free operation.
The dual-wall concept combines an aluminum horizontal or vertical window with an aluminum self-storing storm window and installs them on a "weather break" ... consisting of the sidewall studs and outer sheathing. The result ... the most complete structural window combination for guarding against energy-wasting penetration of cold in the winter, heat in the summer ... and reducing window condensation to a minimum - a truly cost effective system.
Features
This item ships via:  LTL Freight
Our Goal is to deliver your purchase in the quickest and most economical way possible. Shipping service and costs are determined by product, weight, package size and ship to destination.
To view shipping rates prior to checkout, add the product(s) to the shopping cart. On the My Cart page, click "calculate shipping rates", when the popup appears, enter your state and zip code and click update. The services available for the entire order will appear with the actual cost.
Order Tracking: In most cases you will receive shipment notification via email. You can also track your order online. For assistance contact us.
Materials needed: Vinyl Foam Weatherseal and Hex Head Screws.
| Taking Measurements Measure the width and length between the rough opening. Note: Measuring the outer frame of an existing storm window or the exterior window will result in incorrect sizing. | |||||
| Installation Instructions 1. Make certain the mounting surface the storm window is to be placed over is correctly sized and constructed. The surface that the storm window is to rest against should be flat, level, and free of any debris. Cover/seal any cracks or holes that may allow for air leakage. 2. Apply a suitable low density foam tape (Vinyl Foam Weatherseal) to the back side of the storm window mounting flange. Failure to seal between the mounting surface and the storm window may cause condensation problems. 3. Place the storm window in the opening. Center the window and install one Hex Head Screw in the frame sill. Level (horizontal) the frame sill and place one screw in the frame head (See Figure 1). Check plumb (vertical) and square (90° corners). The sill of the window should be level within 1/8" across its width. The squareness of the window should be checked with diagonal measurements (See Figure 2). The difference between 1 to 4 and 2 to 3 should not exceed 3/8". Install the remaining screws starting with the sill, then the head and the sides last. Note: Do not over drive the screws; to do so will unduly deform the window frame and compromise the seal. 4. Once the storm window is installed, operate the sash by pushing the (2) spring-loaded slide bolts located on the operable sash towards each other and sliding the sash open. If the sash does not slide smoothly within its window track, check frame to insure it is square and remove screws and re-align window frame if applicable. This should correct the problem. Note: It is possible to install the storm window "upside down" and or "inside out" which will cause the window to operate incorrectly. | |||||
 |  | ||||

