Contact us for advice or more details. Our mobile home and RV parts specialists are here to help you and answer your questions.

Dimensions: 30 1/4" Width x 54 1/4" Length Rough Opening - Single Hung Tilt Style with 6 x 6 Integral Grids
Features
This item ships via:  LTL Freight
Our Goal is to deliver your purchase in the quickest and most economical way possible. Shipping service and costs are determined by product, weight, package size and ship to destination.
To view shipping rates prior to checkout, add the product(s) to the shopping cart. On the My Cart page, click "calculate shipping rates", when the popup appears, enter your state and zip code and click update. The services available for the entire order will appear with the actual cost.
Order Tracking: In most cases you will receive shipment notification via email. You can also track your order online. For assistance contact us.
Materials needed: Caulking Sealant and Screws.
| Taking Measurements Measure the width and length between the rough opening. Note: Measuring the outer frame of an existing window will result in incorrect sizing. | ||||
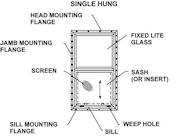
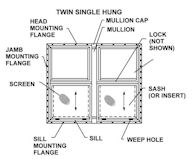
| Installation Instructions 1. The rough opening should be 1/4" greater in width and height than the portion of the window that fits in the rough opening. The rough opening sill must be square to the floor within 1/8" across its width. If the rough opening sill is out of square by a greater amount, it may not be possible to shim and square the window in the opening. 2. Inspect the exterior face of the rough opening where the mounting flange of the window will contact. This area must not have gaps or voids beneath the mounting flange. The sheathing or exterior wall material that the window will be fastened to must be structurally adequate so that the window unit is fully anchored. 3. Inspect the mounting flanges to ensure they have not been bent or distorted during shipping and handling to the extent that they will not seat flat against the exterior perimeter of the rough opening. If bent or distorted, straighten the mounting flange so that it will make contact with the exterior face of the wall. 4. Windows must always be closed during installation. Make sure there are no gaps and voids between the mounting flange and the exterior perimeter of the rough opening. Gaps or voids in this area may provide a path for water and air to enter. 5. Apply a continuous 1/4" bead of sealant caulk to the backside of the mounting flange, in line with the pre-punched holes or within 1/4" of the outer edge of the mounting flange. If using a sealant caulk, be sure to install the window before the sealant sets up on the mounting flange. 6. Place the window in the rough opening with the window sill resting on the rough opening sill. If the rough opening sill is not square to the floor and if you have elected to shim the window, place the shims beneath the lower corner of the unit until the sill of the unit is square. Shims must be placed beneath the extreme corners of the window frame, additional shims must be placed every 12" on center to fully support the weight of the unit. Do not use shims on the header, or building loads will be transferred to the window, causing improper operation or failure of window. 7. Center the window from left to right, but do not remove the sill from contact with the rough opening sill and any shims that were required to square the sill of the unit. While holding the window flat against the exterior wall, start a corrosion resistant Hex Head Screw in the approximate center of one of the frame/jamb mounting flanges. Continue installing screws in the following order: Center of opposite frame/jamb, center of head and center of sill. Re-check the window to be certain it is centered from side to side in the opening, and that the window frame members are straight and the frame is square. Check to ensure the window operates properly, if it does not, remove the screws and reinstall. Continue installation of the rest of the screws, starting in the center of each member and progressing out to the corners. Note: Do not over drive the screws; to do so will unduly deform the window frame and compromise the seal. Note: It is possible to install the window "upside down" and or "inside out" which will cause the window to operate incorrectly. The weep holes are always at the bottom of the window, never fill, modify or block weep holes. | ||||
 |  |  | ||
Already purchased this product? Write a review
Dimensions: 30 1/4" Width x 54 1/4" Length Rough Opening - Single Hung Tilt Style with 6 x 6 Integral Grids
Features
This item ships via:
LTL Freight
Our Goal is to deliver your purchase in the quickest and most economical way possible. Shipping service and costs are determined by product, weight, package size and ship to destination.
To view shipping rates prior to checkout, add the product(s) to the shopping cart. On the My Cart page, click "calculate shipping rates", when the popup appears, enter your state and zip code and click update. The services available for the entire order will appear with the actual cost.
Order Tracking: In most cases you will receive shipment notification via email. You can also track your order online. For assistance contact us.
Materials needed: Caulking Sealant and Screws.
| Taking Measurements Measure the width and length between the rough opening. Note: Measuring the outer frame of an existing window will result in incorrect sizing. | ||||
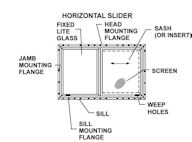
| Installation Instructions 1. The rough opening should be 1/4" greater in width and height than the portion of the window that fits in the rough opening. The rough opening sill must be square to the floor within 1/8" across its width. If the rough opening sill is out of square by a greater amount, it may not be possible to shim and square the window in the opening. 2. Inspect the exterior face of the rough opening where the mounting flange of the window will contact. This area must not have gaps or voids beneath the mounting flange. The sheathing or exterior wall material that the window will be fastened to must be structurally adequate so that the window unit is fully anchored. 3. Inspect the mounting flanges to ensure they have not been bent or distorted during shipping and handling to the extent that they will not seat flat against the exterior perimeter of the rough opening. If bent or distorted, straighten the mounting flange so that it will make contact with the exterior face of the wall. 4. Windows must always be closed during installation. Make sure there are no gaps and voids between the mounting flange and the exterior perimeter of the rough opening. Gaps or voids in this area may provide a path for water and air to enter. 5. Apply a continuous 1/4" bead of sealant caulk to the backside of the mounting flange, in line with the pre-punched holes or within 1/4" of the outer edge of the mounting flange. If using a sealant caulk, be sure to install the window before the sealant sets up on the mounting flange. 6. Place the window in the rough opening with the window sill resting on the rough opening sill. If the rough opening sill is not square to the floor and if you have elected to shim the window, place the shims beneath the lower corner of the unit until the sill of the unit is square. Shims must be placed beneath the extreme corners of the window frame, additional shims must be placed every 12" on center to fully support the weight of the unit. Do not use shims on the header, or building loads will be transferred to the window, causing improper operation or failure of window. 7. Center the window from left to right, but do not remove the sill from contact with the rough opening sill and any shims that were required to square the sill of the unit. While holding the window flat against the exterior wall, start a corrosion resistant Hex Head Screw in the approximate center of one of the frame/jamb mounting flanges. Continue installing screws in the following order: Center of opposite frame/jamb, center of head and center of sill. Re-check the window to be certain it is centered from side to side in the opening, and that the window frame members are straight and the frame is square. Check to ensure the window operates properly, if it does not, remove the screws and reinstall. Continue installation of the rest of the screws, starting in the center of each member and progressing out to the corners. Note: Do not over drive the screws; to do so will unduly deform the window frame and compromise the seal. Note: It is possible to install the window "upside down" and or "inside out" which will cause the window to operate incorrectly. The weep holes are always at the bottom of the window, never fill, modify or block weep holes. | ||||
| | | ||

"Very fast delivery of the part that I needed. Very pleased and will definitely order from Mobile Home Parts Store for all my replacement parts."
-Gladys J

"Couldn't believe I got the order so fast. Thank you for the wonderful customer service. I wish all companies would offer the service you do."
-Valerie L


